Close

Vibrant Dahlias
Lesson Plan, Grades 3-12, Math, Science, Sax, 3-D
Description
Lesson Plan and Artwork by Nadine Dresbach
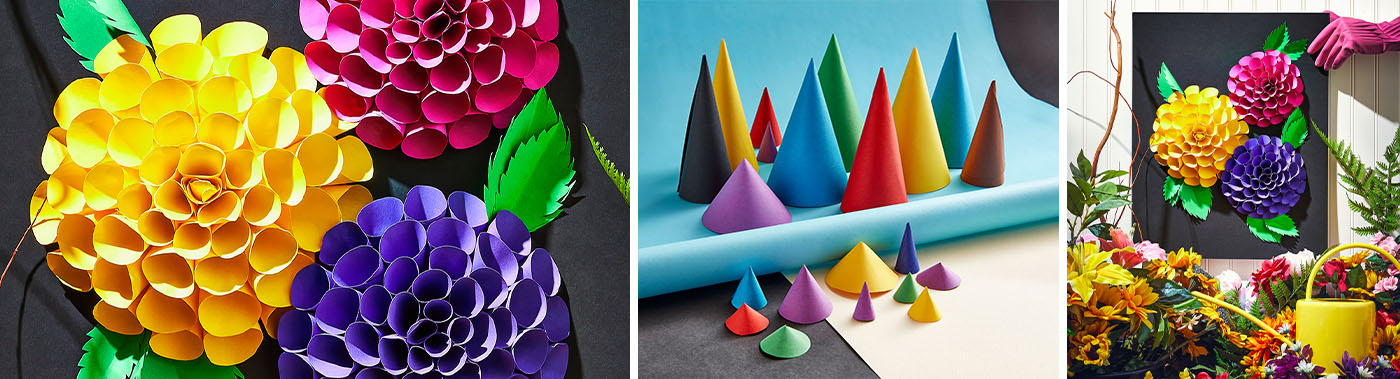
In this lesson plan, brilliantly colored dahlias take a three-dimensional form with a simple paper sculptural technique. Students will use science observations and math calculations to create these radial designed pops of color using bright sheets of crisp Sax Colored Art Paper.
Objectives
- Students will study the construction of species of dahlia flowers and note their design patterns.
- Students will use pre-planning to select colors, elements and principles of design to create the arrangement of their final piece.
- Students will use math to create the gradation of sizes in the cones used to construct their flowers.
Supplies Needed
Sax® Colored Art Paper, 9 x 12 Inches, Assorted Color, 50 Sheets
Sax® Colored Art Paper, 12 x 18 Inches, Assorted Colors, 50 Sheets
Aleene’s® Always Ready Fast Grab Tacky Glue®, 4 Ounces
Crescent® No. 8 Ultra-Black Mounting Board, 11 x 14 Inches, Pack of 40
Standards
Standard #1: Generate and conceptualize artistic ideas and work.
Standard #3: Define and complete artistic work.
Instructions
1
Research species of dahlias concentrating on their petals and leaves. The ones used here are the Pompon variety of Garden Dahlia.
2
Sketch a layout of the piece using the elements and principles of design and select colors from the Sax Colored Art Paper to be used for the dahlias and their leaves. This example is a 16” x 20” black mounting board with the dahlias ranging in diameter from 6” to 8”.
3
Prepare the surface to glue the cones onto. This base was created from a small paper plate (a cardboard circle could be used). Using the back of the plate gives a stable base and the curved edges of the plate raises the dahlia from the surface to give it dimension. For the smaller dahlias use the same paper plate but cut off the raised edge. Use acrylic paint to paint the back of the plate a similar color to the petals of your dahlia so the plate will not show through.
4
Create squares of color that will reduce in size as you proceed from the exterior to the interior of the flower. As a guide: the 8” dahlia pictured used 3”, 2½”, and 2” squares using about two layers of cones from each size. Each flower used approximately 15 to 17 cones on the bottom row. The number of cones and layers varies depending on the size of the cone and how tightly one cone is placed to the next.
5
Prepare your paper cone petals. Glue approximately 30 of the largest size squares. A 3” square was used for the first two layers of the large flower. Place the square on the table in front of you as a diamond shape and glue the north to the south using tacky glue, creating a pointy cone to the west, and an open end to the east. Fast grab tacky glue works instantly but if you are using an alternate glue, you can secure your cone with a paper clip while it dries.
6
Pompon dahlias have a rounded petal, so after 30 of the cones are created round out each petal edge of the cone with scissors so it is no longer pointy.
7
Repeat this process with the 2 ½” square, and then again with the 2” square. You are now approaching the center of the flower so you will reduce the number of each square that you precut. Start with 20 of the 2 ½” size and 10 to 15 of the 2” size. The numbers you use will vary depending on how tightly the cones are glued together.
8
After your cones are prepared and the tips are rounded, you can start to layer them onto your prepared plate surface. Since the plate is upside down with a curved edge place something under the plate so it won’t collapse when you push down to glue. Place circles of glue like a bullseye on the back of the plate so you’re covering the surface evenly. Do not spread the glue out. Then working in a radial design, lay each paper cone along the edge of the plate, pointy tips toward the center. Adjust cones as needed to fit evenly around the plate.
9
Moving onto the next layer, it may be necessary to cut the pointy tips off the cone while building layers to fit them in. When gluing down your second layer, use the same process of a bullseye of glue on top of your first layer with a little in the center too. Start layering your second layer on top setting it back a bit further so that you will achieve a reduced size to the second layer.
10
Repeat this process with the 2 ½” and 2” squares until you have completed the larger flower. As mentioned, it may be necessary to cut the pointy tips off the cones, particularly in the middle layers, to achieve the reduced size but in the very middle keep the tips intact and nestle the cones in tightly to each other to simulate the design of the original dahlia flower.
11
Proceed to create the smaller flowers that you have in your design. To create the smaller flowers, this example uses 2 ½”, 2”, and a 1 ½” squares.
12
To complete the piece, examine the leaf shapes of the dahlia type you are re-creating and cut them from the Sax Colored Art Paper with a centerfold on each to create dimension. Glue the pompon flowers and leaves to mounting board using tacky glue.
13
After mounting, create a garden gallery in your classroom!