
Close

Community Succulent Garden
Lesson Plan, Grades 8-12, Science, Sax, 3-D, Ceramics & Sculptures
Description
Lesson Plan and Artwork by Nadine Dresbach
In this lesson, students will use air-drying Sax® Paper Based Clay to create a community succulent garden. Students will research the genus and species of various succulents while noting their colors and forms. Students will work together on details and planning while re-creating this calming small environment.
Objectives
- Research botany and study the varieties of genus and species of succulent forms.
- Analyze succulents’ textures, shapes, color, tints, and tones.
- Use elements and principles of design as a class to lay out the composition in the planning of the garden.
- Practice skills and techniques with Sax Paper Based Clay to create the components of the succulents.
Supplies Needed
Sax® Ready to Use Paper Based Clay, 1 lb
Sax® Premium Acrylic Paint
Sax® Sulphite Drawing Paper, 18" x 24"
Aleene’s® Fast Grab Tacky Glue®
Fiskars® Micro-Tip Scissors
*Here are the supplies needed for this lesson plan for reference. Find a convenient carousel of shoppable products for this lesson below.
Standards
Standard #1: Generate and conceptualize artistic ideas and work.
Standard #2: Organize and develop artistic ideas and work.
Standard #3: Refine and complete artistic work.
Instructions
1
Study various species of succulents. Examine the numerous colors and forms, research how they retain water, what their light needs are, and why they typically have a rounded shape.
2
Use cooperative planning as a class and note that the variety of succulents and their colors will affect the final composition. This should be determined before succulents are assigned and created. Group advanced planning should include:
- Determine a container that will hold the communitysucculent garden.
- Select a variety of succulents in different shapes and sizes, noting that any species can be repeated more than once, and its size can change or remain the same.
- Look for species that will be reproducible in clay (longer stem varieties, such as jade, are not recommended due to their fragility).
- On drawing paper, create sketches to scale of each of the succulents that will be placed in the environment and cut them out.
- Determine what their coloring will be and indicate it with colored pencils on the sketches.
- Using a large piece of drawing paper, draw the accurate size and shape of the surface of the container to use as the “planner” for the garden.
- Create a composition using the colored sketches of the succulents. Changes in size, species, or color can be made at this time. Small elements such as rocks or shells can be created from the paper clay and added into the environment; consider those in the planning and placement of items.
3
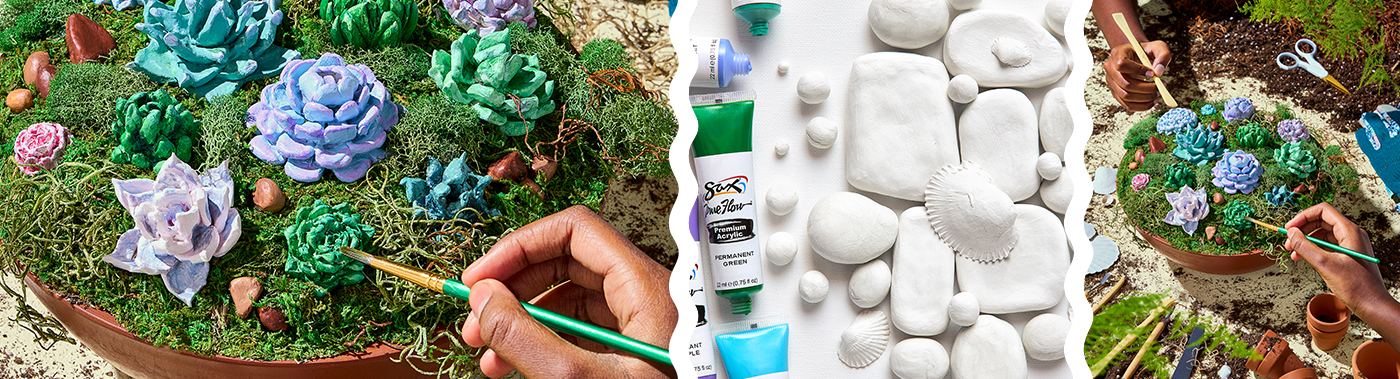
Demonstrate techniques of modeling the clay. The Sax Paper Clay is forgiving and soft, but stable enough to hold form. Students can practice the clay techniques on small balls of clay and still be able to reuse the clay for the project. Just slightly dampen when necessary. Several techniques were utilized in the shown image.
- Individual Layers: 1) Create a thin slab about 5" x 8" & 1⁄8" thick. 2) Use a biscuit cutter (succulent size) to cut circles of various sizes. 3) Cut leaves along the edges of each round slab, focusing on the original image to see approximately how many leaves are needed for each layer. 4) Attach each layer by scoring the center (slightly dampen if necessary) and set it on top of the previous layer. 5) Gently press the eraser end of a pencil in the center to attach. 6) Continue with the rest of the layers and fasten smaller leaves in the very center.
- Scissor Method, Horizontal: 1) Begin with a rounding lump of Sax Paper Clay the appropriate diameter of the succulent. 2) Using small, pointed scissors, start with the bottom layer and cut into the “lump” horizontally, making small snips all the way around only going about ¼" into it. Then make a vertical snip at each ½" or ¼" inch (depending on succulent size) around the layer. Take each of these “leaves” and pinch the end to make the points at the end of each leaf, or round them, depending on the species. Repeat with next layer up and continue to the top.
- Scissor Method, Vertical: 1) Start with a small lump of clay that narrows at the top. 2) Using small, pointed scissors, cut into the lump vertically around the base first and then the second layer, third layer, etc., pinching the tip of each cut section. 3) Pull the leaves out slightly. This creates a tighter succulent form.
4
After the shape and leaves are created, use clay modeling tools and small clean paint brushes to finish and refine the succulents. Other elements for the garden can now be created, such as small rocks or shells. This clay casts very well; press it into small seashells, dry for a few days, and pop out. Allow all clay to dry for several days, turning it over each day to dry evenly.
5
When succulents are completely dry, refer to the original images and sketches. Practice color mixing to create a palette to match the predetermined colors using Sax Premium Acrylics.
6
Begin with a basecoat and include variations in color such as shadows and tip colors. Allow acrylic to completely dry.
7
Depending on the vessel you have chosen, the main body of the container will need to be filled. This can be done with styrofoam or other firm filling. The filling(s) will need to be glued into place so that the top layer will be stable for attaching the elements of your garden.
8
Refer to your class planning document and attach succulents to the garden first, using a very strong craft or tacky glue (hot glue not recommended).
9
Attach additional ground elements such as dried/preserved moss, sand, pebbles, and small additional items created such as rocks or shells.
10
Display the finished piece in the school gallery, district/main office, or classroom for all to admire!